Installing eSIM on iPhone: The Ultimate Step-by-Step Guide
How to install eSIM in iPhone: Step-by-Step Guide (2026)
If you're looking for the easiest way to install eSIM on iPhone, the process usually takes only a few minutes. Most questions come from knowing where the settings are rather than the installation itself.
Some people need to set up eSIM in iPhone before an international trip, while others simply want a second mobile line for everyday use. Others simply want to add a second mobile line without replacing their existing SIM card.
The process itself isn't complicated, but the available options can be confusing if you've never used an eSIM before. The installation itself is rarely the difficult part. Most of the time is spent figuring out where Apple has placed the eSIM options in iPhone settings.
What is an eSIM?
Think about the last time you changed a SIM card. It probably meant finding the SIM tray tool, removing a tiny plastic card, and trying not to lose it. An eSIM removes that part of the process. The mobile plan is added directly to the iPhone, so there is no card to insert, replace, or carry while changing networks.
For someone using one number every day, the difference may feel small. For people planning an eSIM for Europe trip, business users, or anyone managing two mobile lines, it can remove several extra steps that used to be part of switching between carriers.
Common Uses for eSIM
An eSIM fits into different situations. Some people install one before traveling abroad, others use it to separate work and personal numbers, and some simply prefer having two mobile lines available on the same iPhone.
Which iPhones Support eSIM?
Apple has supported eSIM for several generations of iPhone, starting with the iPhone XS lineup. If your device was released after that, there's a strong chance it already includes eSIM support.
Rather than trying to remember every compatible model, it's usually quicker to check the feature directly on the phone. The next section shows exactly where to look.
How to Check if Your iPhone Supports eSIM
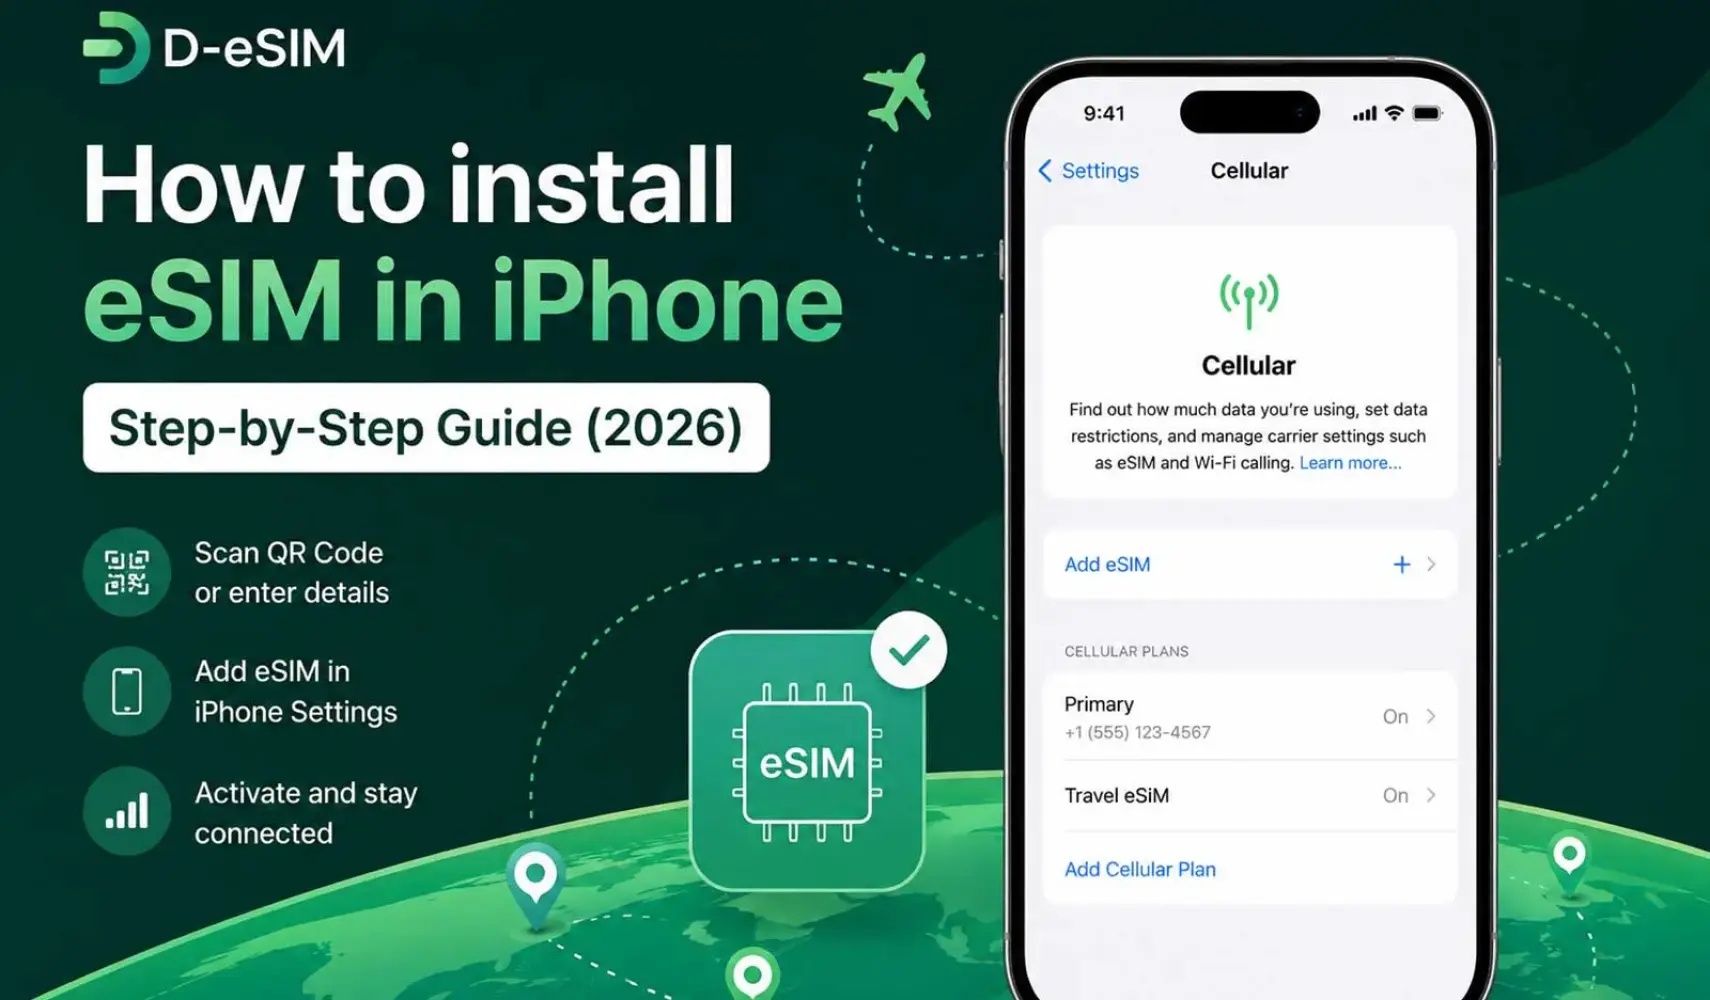
Not sure whether your iPhone has eSIM? You don't need to search for the model first. Open Settings and tap Cellular (or Mobile Service in some regions). If the menu includes an option called Add eSIM or Add Cellular Plan, your iPhone supports eSIM.
If that option isn't there, open Settings → General → About and check your iPhone model. Some models sold in specific countries have different eSIM capabilities, so the model number is worth checking before purchasing a plan.
How to Install an eSIM on iPhone
The first step isn't opening the Settings app. It's checking what your eSIM provider has actually sent you. Some providers send a QR code. Others send activation details.
A few complete the setup through their own iPhone app. The installation method depends on that information, not on the iPhone itself.
Before You Start set up eSIM
Take a moment to confirm that your iPhone is connected to the internet and that the activation email or QR code is easy to access. If your carrier requires an unlocked phone, it's worth checking that before starting the installation.
If You Received a QR Code
Open Settings → Cellular → Add eSIM and choose the option to scan a QR code. After the code is accepted, iPhone will display the mobile plan before asking whether you'd like to add it.
If You Received Activation Details Instead
Some providers skip QR codes completely. In that case, select the manual setup option and enter the information exactly as it appears in the activation email.
If Your Carrier Uses an App
Some mobile operators handle installation within their own apps. When that's available, simply follow the carrier's instructions until the new line appears in your iPhone settings.
How to Activate Your eSIM for Travel
One question comes up surprisingly often: Should you activate the eSIM before the flight or wait until you arrive? There isn't a single answer because providers don't all work the same way.
Installation and activation aren't always the same event. Depending on the provider, your plan may not begin until the iPhone connects to a supported network after you arrive. Knowing that in advance can help you avoid activating an eSIM for international travel earlier than intended.
For that reason, it's worth checking the activation policy before doing anything else. A two-minute check before departure can prevent the loss of a day of service.
One Thing to Check Before You Fly
One detail is worth checking before leaving for the airport: when your eSIM actually becomes active. Not every provider follows the same activation policy. Some plans begin as soon as the eSIM is activated, while others don't start until the phone connects to a supported network in the destination country.
Spending a minute to read the provider's activation instructions can help you avoid using any part of your plan before the trip has even started.
Your First Step After Landing
After arriving, give the phone a moment to connect to a local network before assuming something is wrong. In many cases, the connection appears automatically after a short wait.
If the connection isn't available right away, give it a little time. Some networks take longer than others to recognize a newly activated eSIM.
Choosing Which Line Uses Mobile Data
A travel eSIM can be installed correctly and still not be the line your iPhone uses for mobile data. Checking this setting before heading out can save a lot of unnecessary confusion later.
Open Settings → Cellular → Cellular Data and choose the eSIM you want to use for internet access. This setting can be changed at any time, so switching back to another line later only takes a few seconds.
If you're keeping your regular SIM for calls and messages while using a travel eSIM for data, this is one of the settings you'll probably use most during the trip.
Common eSIM Installation Problems
Not every installation goes the same way. When something doesn't work as expected, the issue is often linked to one of the situations below.
| What you notice | What usually causes it | What to try |
|---|---|---|
| The QR code won't scan | The code has already been used, or the camera can't read it clearly | Increase screen brightness, clean the camera lens, or ask the provider whether a new QR code is required. |
| "Unable to Add eSIM" appears | The iPhone may be locked to a carrier, or the activation details may be no longer valid | Check whether the device is carrier-unlocked and confirm the activation information with the provider. |
| The eSIM is installed but there's still no signal. | A new eSIM doesn't always connect to the network immediately. Right after installation, the network may not appear immediately. | In many cases, the signal shows up on its own after a short time. If nothing changes, restart the iPhone before trying anything else. |
| Mobile data isn't working | Another line may still be selected for data | Review which line is assigned to mobile data in the iPhone settings. |
| Activation stops halfway | An unstable internet connection interrupted the process | Connect to a reliable Wi-Fi network and try again. |
Things Worth Checking Before You Travel
There's no harm in keeping the activation email for a little longer. Some providers don't allow the same QR code to be used again, and activation policies can vary from one plan to another.
A quick check before the trip makes it easier to know exactly when the plan will begin. Some plans start immediately after activation, while others begin only after connecting to a supported network at your destination.
Finally, if you'll be using two mobile lines during the trip, spend a moment confirming which one is selected for mobile data. It's much easier to check this at home than after you've landed.
Installing an eSIM becomes much more straightforward once you know where the settings are and which activation method your provider uses. Whether you need to install eSIM on iPhone before a trip, set up eSIM in iPhone for a second mobile line, or add eSIM in iPhone for everyday use, the steps are largely the same.
The only real differences usually come from the activation details supplied by your carrier. Keeping the activation email, checking when the plan becomes active, and confirming which line is selected for mobile data can prevent unnecessary interruptions later.
With those details in place, your iPhone is ready to connect without replacing a physical SIM card, making plan changes much simpler.
Frequently Asked Questions
How do I convert a physical SIM to an eSIM on iPhone?
The option is available only if your mobile carrier supports SIM conversion. When it isn't offered, the carrier needs to issue a new eSIM instead.
How can I transfer an eSIM to a new iPhone without the old phone?
Losing access to the old iPhone doesn't necessarily mean starting from scratch. Most carriers provide another way to activate the line on a replacement device.
Can I use two eSIMs on iPhone?
Recent iPhone models are designed to work with more than one eSIM. The number of active lines depends on the device and the version of iOS installed.
Can I store multiple eSIMs on my iPhone?
An iPhone can keep several eSIM profiles, although only a limited number can remain active at the same time.
Can I install an eSIM before traveling abroad?
Many travel eSIMs are installed before departure, while activation follows the rules set by the provider rather than the installation date.
Can I Use an eSIM and a Physical SIM at the Same Time?
Many people use this setup when traveling. The physical SIM can stay active for calls or text messages, while the eSIM handles mobile data on supported iPhone models.
Will I Keep My WhatsApp Number?
Switching to an eSIM doesn't give you a different phone number. If your number stays the same, your existing WhatsApp account stays exactly as it is.
Do I Need an Internet Connection to Install an eSIM?
The installation starts by downloading the eSIM profile to your iPhone. For that reason, Wi-Fi or another internet connection needs to be available before setup can begin.
Can I Delete and Reinstall an eSIM Later?
What happens after deleting an eSIM depends on the provider. Some activation codes work only once, while others can be used again if the eSIM needs to be installed later.
Does installing an eSIM remove my physical SIM?
Adding an eSIM leaves the physical SIM exactly where it is. Both can remain on the phone at the same time if the device supports Dual SIM.
Ready to Stay Connected?
Get your travel eSIM from D-eSIM and avoid expensive roaming on your next trip.
Browse eSIM Plans Check Compatibility